

The onset of autumn is definitely an excuse to wear more dramatic makeup and this winter weather just screams to be cheered up with a dark red lip. It takes guts to wear one because the very thought of wearing intense, dark colours can be intimidating, but the key to pulling it off is keeping the rest of your makeup minimal.

I took inspiration from the stars of stage and screen that are rocking the vampy red lip and looking totally gorgeous while they do it. Here's my take on the trend.
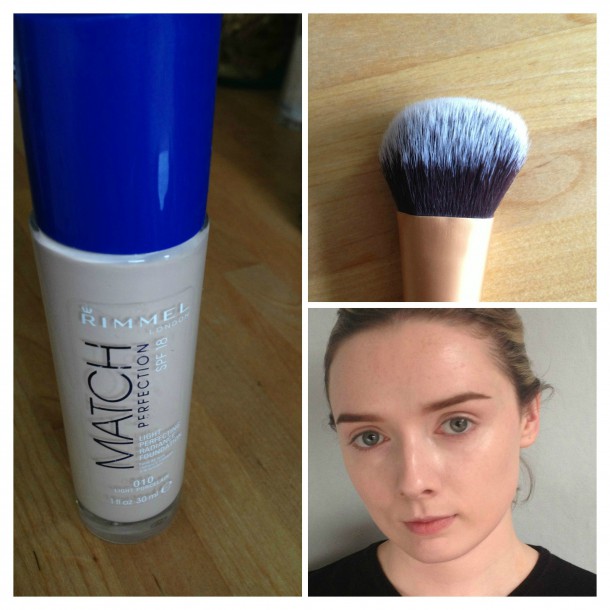
STEP ONE
- This look is all about a sheer, flawless base. High coverage foundation will transform it easily into an evening look, but I'm aiming for something suitable for daytime. Use a foundation that lets your skin show through. I’ve chosen Rimmel’s Match Perfection, as it is light but buildable and has a lovely dewy finish. Buff it in with a dense, fluffy brush, smoothing away any harsh lines.
- Conceal under the eye area and any blemishes as required. I like Collection’s Lasting Perfection Concealer.

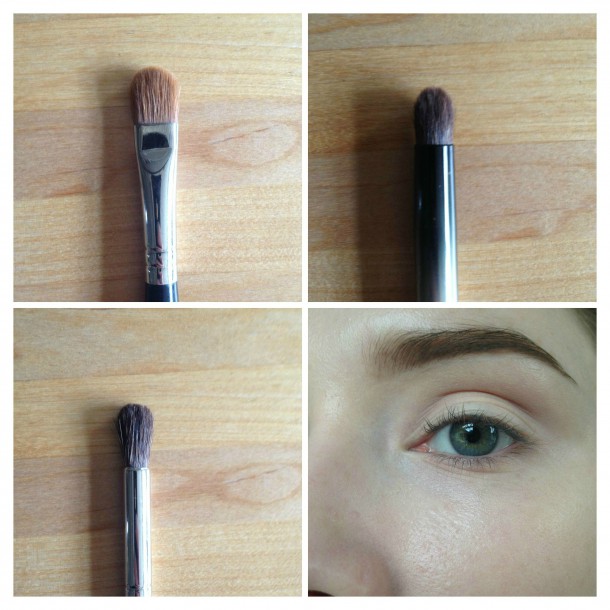
STEP TWO
- Fill in your eyebrows as you usually would, then move onto the eyes. For an understated eye, you’ll need a satin or matte beige shadow, and a matte taupe shadow. I’ve chosen Mac Vanilla and Quarry eye shadows.
- Pack the beige shadow onto the entire lid with a stiff, flat brush. Then using a soft pencil brush, run the taupe shadow along the crease of your eye, where the lid meets the eye socket. You can do this with your eye open to make it easier to locate the crease. Blend away any harsh lines with a fluffy blending brush and apply a couple of coats of your favourite mascara.
STEP THREE
Advertised
- Using a fluffy, angled contour brush, sweep a bronzer of your choice (I like Benefit Hoola) beneath your cheekbone (from where your ear meets your cheek bone- if it’s not visibly obvious, have a poke about the area directly in front of your ear and you’ll feel it).
- I like to apply it using a very gentle ‘U’ motion, sweeping it down beneath the cheek bone and then arcing the brush back up toward my eye. Obviously stop before putting bronzer on your cheeks! This prevents any harsh or obvious ‘stopping point’ which makes the contour visible when looking at the face from the front. Contour which is visible head-on looks a bit scruffy and obvious.
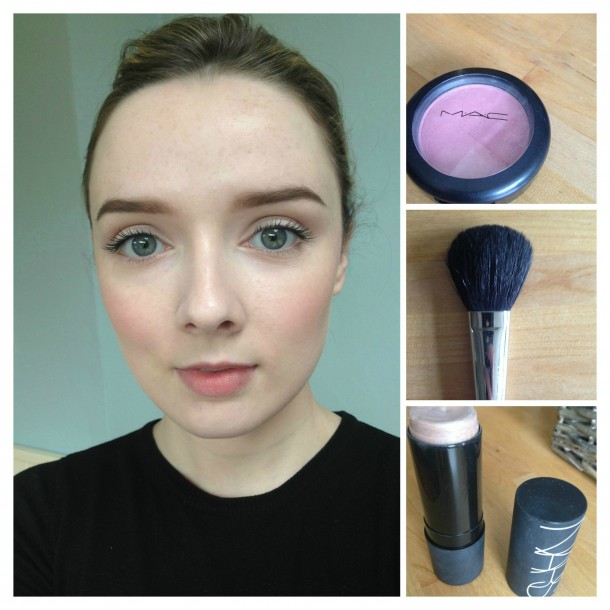
STEP FOUR
- Apply a subtle blush to the apples of your cheeks with a fluffy blush brush. Less is more with a look like this. The tone you need varies according to your skin tone – if you’re super pale like me, a very soft pink (like Mac’s satin blush in Well Dressed, which I’m using here) is perfect.
- If your skin tone is deeper or sallower, a rosy pink or peachy tone will look great on you.
- For deep skin tones, a really deep tawny pink or even something red-toned will create a gorgeously subtle flush on your skin.
-
Since skin is the real hero of this kind of look, you want it to glow. Apply a highlighter (Nars Copacabana is my favourite) along the top of your cheekbones, down the bridge of your nose and on your cupids bow. You can also place some on your brow bone if you’d like. I prefer cream highlighters to powder simply because they keep the skin dewy and, I think, reflect the light in a way that looks more natural.
Remember that your highlighter should be blended invisibly into the area where it meets your blush and your blush should be blended invisibly into your contour. Seams are undesirable.
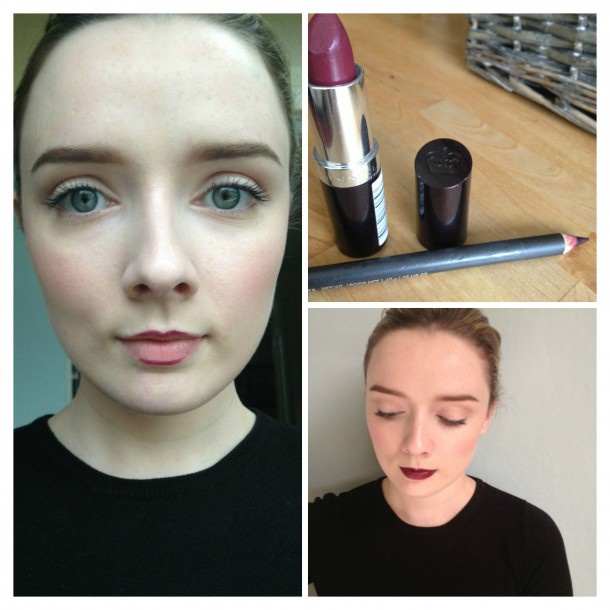
STEP FIVE
- When you want to wear a statement lipstick it’s important to make sure that your lips are in good condition. If they’re flaky, give them a good exfoliating with a cotton bud and your usual lip balm. This is a great way to gently scrub off any flaky skin and moisturise your lips.
- Start with a plum or purple lip liner (depending on how brave you’re feeling!). I’m using Mac’s liner in Currant here. To ensure a natural shape, start in the centre of your upper and lower lip. Just follow the line of your cupid’s bow and the bottom of your lower lip.
- If you look like you have weird geisha lips, you’re doing it right. Applying liner this way allows you to better see any asymmetry naturally occurring in your lips, making it easier to even out if you want to. It’s also just easier to work from the centre of the lips out, rather than the other way round!
- Once you’re happy that you’ve got the centre line (top and bottom) as you want it, follow the line out to the edge and fill in both lips with the liner.

- Then go over the top with whatever dark, daring lipstick you’re in the mood for. I’m using Lasting Finish Lipstick by Rimmel in Starry-Eyed.
Now there’s clearly no point in wearing this and being timid. So I insist that you go out and STRUT. Does this seem like a look you might try on a braver day?
Advertised
Laura Kennedy

