

Iridescent, jewel-toned eyes are are the look of the moment with zillions of metallics and jewelled tones hitting makeup counters. Which is nice – because they’re glorious.
This look is full-on and dramatic. I really think that it’s a wonderful excuse to create an evening look that goes BAM! It is adaptable and can be made subtler quite easily but in my selfishness, though, I’ve gone a bit mad.
Ah, go on – humour me!
STEP ONE
-
This eye look is heavy and involves a lot of blending of different shadows which will result in masses of falldown that will ruin your base. So save yourself a lot of hassle by doing your eyes before your base.
-
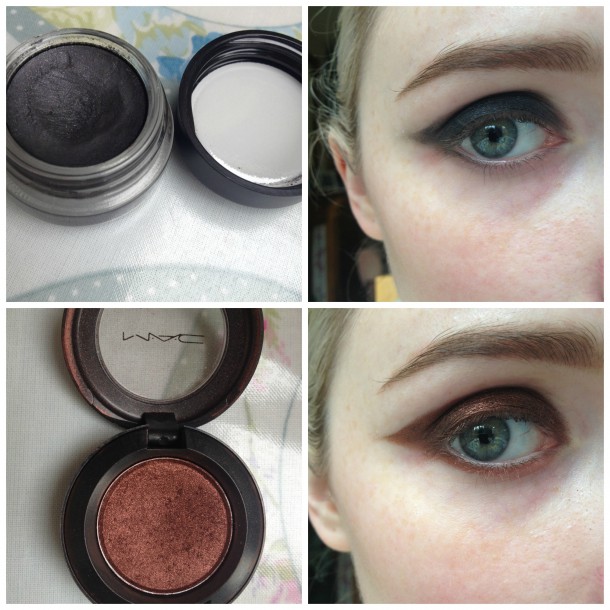
It's a dramatic look, so we’re aiming for clean lines. Since I’m using a lot of product, I want to prime my eye. I’ve chosen Mac’s paint pot in Blackground. It’s perfect for this look as the jewel-toned shadows will be intensified when layered over a black base – you won’t have black eyes! You can use any cream shadow of your choice, but I’d recommend something black or dark.
-
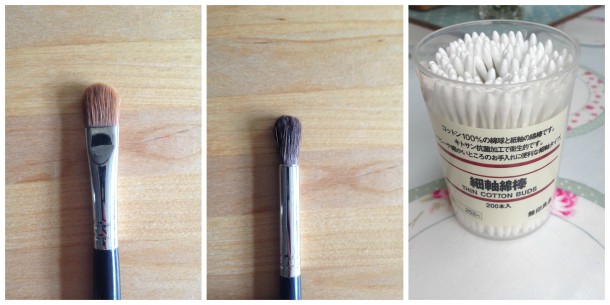
Using a dense, flat brush, pack on the cream shadow, wiggling it right down into the lashes to prevent any obvious white line above them. Wing the liner out quite dramatically.
STEP TWO
-
Clean off your flat shadow brush and pat an iridescent, copper or ruby-toned shadow on top of the black cream shadow. When you’ve finished doing this, the black should be invisible and the iridescent shadow should really pop. I’ve chosen to use Mac’s Veluxe Pearl shadow in Antiqued.
-
Don’t be frightened of making a mistake while doing this. Cotton buds are your best friend here- use them to clean up the area and neaten your line. This will be easy as you’ll have no foundation to disturb, so take your time and make as many mistakes as you like! I love the tiny Japanese cotton buds available from Muji – I find the standard pharmacy buds too big and fluffy for creating clean lines.

Advertised
STEP THREE
-
Take a matte or satin brown shadow (I’m using Mac’s Concrete) and, using a fluffy blending brush, soften the crease area of your shadow. You’re aiming to soften the sharp lines, but not to eradicate them, so blend carefully.
STEP FOUR
-
This step is optional, but to add further iridescence to the eye, I added my absolute favourite shadow ever, Mac’s loose pigment in Blue Brown, to the centre of my lid with the same flat shadow brush. This step adds enormous shine and depth of colour to the eye. If you don’t have this product, a dab of loose glitter or even a metallic blue shadow will give your eye look a beautiful complexity.

STEP FIVE
-
Now for the scary bit – gel liner. I’m using Maybelline’s Lasting Drama gel liner in black. This product is great, and won’t budge. I’m applying it with a fine liner brush.
-
If you hate liner or find it a pain, try applying a little strip of scotch tape where you want your flick – this method will ensure that both eyes are symmetrical and that you have a clean line. Don’t worry, peeling it off doesn’t hurt - just don’t tape your eyelashes (I did once; it hurt).
-
I find liner easier to master if I continue the line almost beyond the point where it seems it should stop, and then pull it back up into a flick, as in the photo.
-
When you’re happy with your flick, clean the area under it to make sure you have a really sharp line.
STEP SIX
-
Run the first iridescent shadow you used earlier (in this case, Antiqued) under the eye.
-
Apply a black pencil to the upper and lower waterlines to enhance the feline shape of the eye; if your eyes are on the smaller side, skip this step.
-
Apply a couple of coats of your favourite volumising mascara and if you like to, add some lashes. I’ve used three individual lashes on the outer edge of each eye to wing them out further. I applied these with Duo lash glue. If you’re applying lashes, make sure to cover the lash band or bulb with your black gel liner once the lashes are in place.
STEP SEVEN
Advertised
-
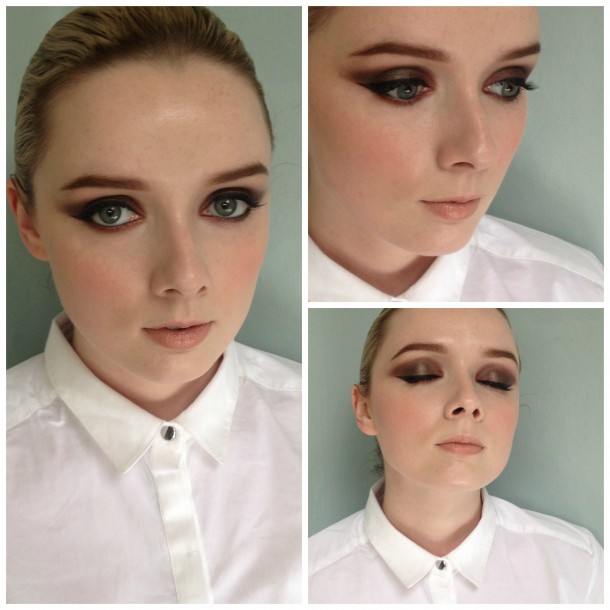
Finish your makeup as you like – though an eye this dramatic is great with a foundation that offers more coverage then you might use for daytime. Paired with a nude lip, this look just won’t be ignored!
What do you think? Will you be giving this a try?

