

I love makeup. That goes without saying. You probably do too, which is why you're here. Even though the fact that I trained in makeup means I can do all sorts of fun stuff with it, I tend to do more or less the same thing every day. I don't go outside my comfort zone all that much.
Last week's festive green eye tutorial was the sort of look I did all the time when I was younger and braver. It was fun to push the boundaries a little, so this week I'm pushing them further. I'm about to make a statement that probably isn't acceptable for a makeup artist to say, but I'm scared of pairing a strong eye with a strong lip. I've done it on other people and it looks great, but I prefer to stick to safer looks when I work on myself.
Today, I'm going strong, with some enormous and questionably fluffy hair to boot! You can recreate the whole face or just the elements you like, or none at all. It's Christmas, do what makes you happy!
Step One
- I'm in the midst of a major skin mutiny at the moment. My skin has broken out, so I'll need more coverage than usual. I don't want my skin to look false or masky though, so I'm still using my Rimmel Match Perfection Foundation. Because I need more help and coverage than usual, I'm supplementing that with Bobbi Brown Stick Foundation where I need extra coverage.
- If you're in the midst of a breakout as I am, take your time concealing the individual blemishes carefully. It's time consuming, but entirely worth it!
- Next, fill in your brows. We're aiming for a full but natural looking brow. Check out this handy Brow 101 guide if you're in need of some pointers. I'm using my usual favourite Mac shadows on an angled brush - Omega and Concrete. I use two shades to mimic a natural brow.
Step Two
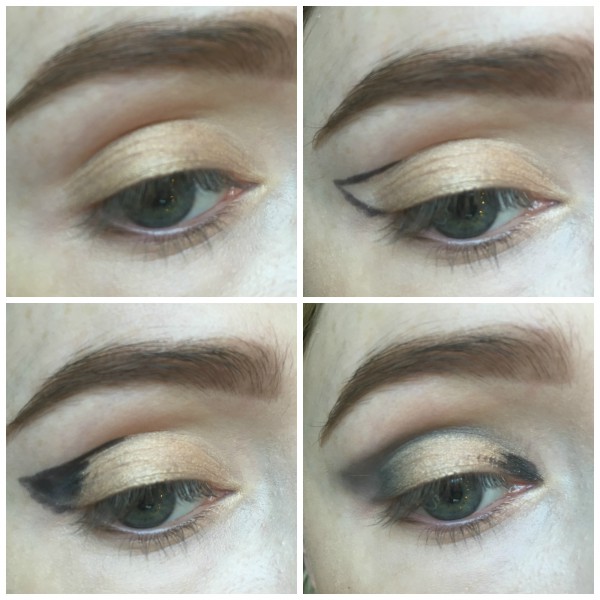
- Time for eyes! As a base, I'm taking No 7's Stay Perfect Shade and Define Eye Crayon in Precious and colouring in the whole lid. Use the side of the crayon rather than the nib to avoid poking your delicate eye! This will provide a base and some grip for the shadows going on top.
- Next, grab a gel liner pencil. I'm using Urban Decay's 24/7 Glide-On Eye Pencil in Black Market. Draw in the outline of a rough wing as in the photo top right. Don't worry if it's a bit shabby looking - we're blending it out anyway!
- Fill in the wing, extending the line at the top along the crease of your eye.
- Next, grab a clean blending brush and soften the shadow, blending it into the gold. Just keep working at it with the brush until it looks soft and smoky.
- Next, take the liner into the inner corner of the eye as in the bottom right photo above. Again, blend it until it looks soft and wispy.
Advertised
Step Three
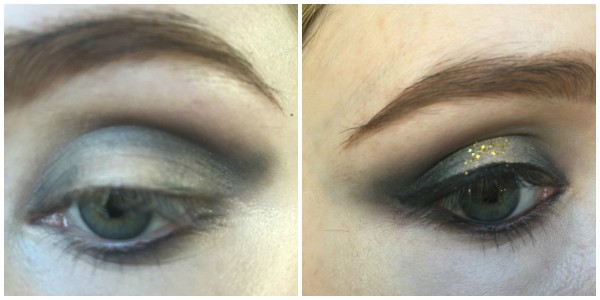
- Take the liner under the eye and blend again using the same brush. If you find that the area above the shadow beneath your brow is looking a bit grubby. pop some concealer under your brow to clean it up.
- Line your upper and lower waterlines too. If this step fills you with horror, don't worry! Just skip it.
- To deepen the intensity, I'm taking some loose black shadow pigment - Dark Soul from Mac - and blending it over the top of the pencil as well as running it under the eye. Use any black shadow you have or are in the mood for.
- Next, grab a clean blending brush and any matte, warm brown shadow or bronzer. Blend this along the crease of your eye to further blend the black shadow and create a sleeker, more interesting finish.
- Next, take some wonderfully tacky gold glitter - I have lots of fancy cosmetic glitters, but in the festive spirit, I'm just using some craft shop gold glitter. Pat it onto the centre of your lid where the gold shadow is. It will stick without a problem.
- Grab your liner again - subtle, this look ain't - and line your upper lashline. I've winged it out a little and smudged it gently with the same blending brush.
Step Four
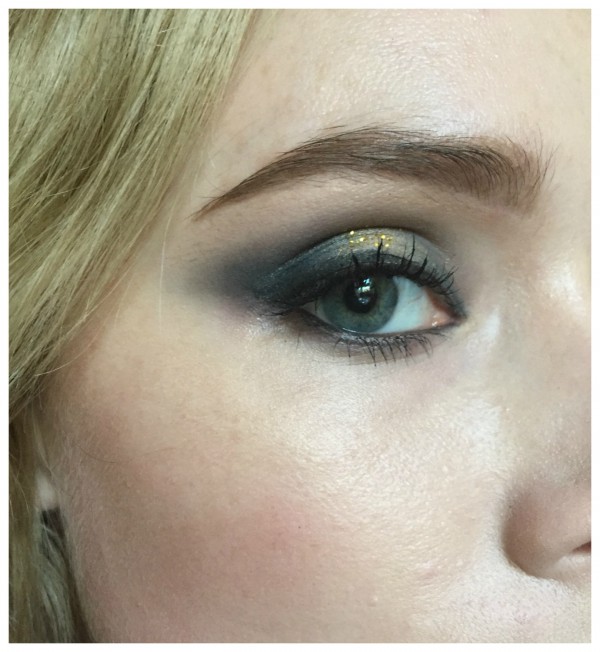
- Mascara comes next. Because I'm also doing a strong lip, I'm skipping false lashes in an attempt to keep the face balanced and prevent the makeup becoming a drag look. I adore drag makeup, but I can't get away with it! Three coats of your blackest and most hardworking mascara will have to do the job.
- I'm skipping blush and applying a bit of contour instead. In the interest of utter fabulousness, I'm whipping out my Lancome Star Bronzer, which I love with fearsome devotion.
- Using a Real Techniques Blush Brush, I'm sweeping it generously beneath my cheekbones to give my face some life - the stronger the makeup, the more washed out it can make you look. IT's important to put some vigour and structure back into the face.
- This is normally where I'd stop, but I'm going all-out this time, so I'm using Seventeen's Stay Pout Lipstick in Date Night. The texture is beautiful and this feels great on lips even though the formula is matte. If you need a basic lipstick lesson, have a look at this tutorial.
- I've amped up the lip even more by taking my gold eye crayon from step one, and filling in the centre of my lips to add some dimension to the matte lipstick

Advertised
Done! The enormous hair happened on its own because I fell asleep with a towel on my head. Oh, don't you judge. It's not normally my cup of tea, but mad hair is okay with a grungy look like this one.
Would you wear a strong look like this one? Do you have any special makeup-worthy occasions coming up? To the comments!

