

Have you mastered the habit of cleaning your makeup brushes regularly? Great! It is a habit you will never regret as the dirt and grim makeup brushes can hold on to is scary.
However, one thing that is easily forgotten is your makeup sponge. It can seem like a bigger task cleaning it but it holds just as much bad bacteria as your make up brushes. Not something you want to be putting onto your skin.
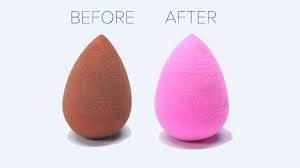
Thankfully, with the right products and the correct instructions, cleaning your makeup sponge doesn’t have to be so complicated. And if you’re not sure where to start, keep reading for the three best ways to wash your makeup sponge quickly and easily.
Soap and water
If your makeup sponge is so dirty that you have forgotten what colour it was when you bought it, you need to reach for the big guns! You can use a liquid cleanser (some baby shampoo works well) or a bar of soap. Both methods will give you the same result: a clean and germ-free makeup sponge.
Step 1 - Your sponge
Squeeze your blending sponge under warm running water until it expands and is completely soaked.
Step 2 - Cleanse
If you’re using a liquid cleanser, squirt the soap directly onto the sponge and begin massaging, pressing and pushing it into the palm of your wet hand. If you’re using bar soap, rub the sponge back and forth against the bar while applying pressure to build up a lather.
Step 3 - Rinse it out
Once the suds have turned all makeup-y, rinse it out. Squeeze the sponge underneath warm water until the water runs clear, then set it aside to dry.
Double Cleanse
No double cleansing isn’t just the newest skin care technique. It can also work for your makeup sponges. If a few stains on a clean sponge will disturb your sleep at night, try double-cleansing your sponge. Soak your sponge in liquid cleanser, a castile liquid soap works well. Afterwards, gently scrub with bar soap to remove every last bit of gunky residue.
Step 1 - Soak
Advertised
Squirt a few drops of castile soap into a small bowl with warm water, submerging the sponge into the soapy solution. Leave it to soak for a few minutes.
Step 2 - Scrub
Work your sponge into the soap bar, paying special attention to the areas with deep stains. Once you have a lather going, use your fingers to massage the soap deeper into the sponge.
Step 3 - Rinse
Once the lather starts looking like old makeup, run it under clean warm water to rinse. Give it a couple of squeezes to wash out all the soap. Set aside to dry.
Microwave it
Yes! You read that correctly. If you’d rather risk acne than spend all that time scrubbing and soaking your sponges, the microwave method is the one for you.
Microwaving your sponge in soapy water is essentially like a supercharged version of putting it in your washing machine, which uses hot water and soap to cleanse fabrics. The microwave energy will also likely kill any micro-organisms that may be growing on the sponge. Win-win!
Step 1 - Mix soap and water in a cup
First, mix a few squirts of mild soap (baby shampoo works well) with water in a microwave-safe cup. Make sure the sponge is covered fully with the mixture.
Step 2 - Wet the sponge
Give the sponge a few squeezes in the water to pre-wet it, then fully submerge it in the cup.
Step 3 - Microwave it
Microwave the cup for about a minute, waiting at least 30 seconds for the cup to cool before removing it from the microwave. The soapy water will have transformed into liquid makeup residue, and your dirty sponge will look just like new.
Step 4 - Wring it out
Advertised
Once the water cools, rinse and wring out the sponge under running water, then set it aside to dry.

