

Serious about Halloween? Because this costume is. We've had a poke through the Beaut.ie archives and have found this gem of a tutorial by the lovely Laura that will guarantee you first place at the Halloween partay.
Halloween is, for a makeup artist, like being a child who finds herself alone in a shop that only sells coloured sugar which explodes when you touch it. Yes; that exciting. So here, for your delectation (or otherwise) is my Marie Antoinette Halloween tutorial.
This can be easily adapted to create different looks and includes instructions on how to create basic wounds, so hopefully there's some Halloween inspiration in here for you. The majority of the products used, like eyeshadow and red lipstick, you'll probably have already.
Because this tutorial is a bit lengthier than usual, I'm going to list all the products used at the bottom of the page, along with where I bought the slightly more elusive products.
Step One
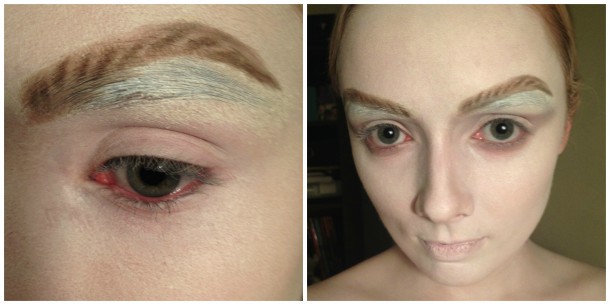
- On a clean, unmoisturised face, grab some pritt stick, and drag it across your brows. Keep layering it until there is a smooth coating over your brows, and allow it to dry.
- Using makeup over pritt stick will not make your brows disappear completely, but it is non-toxic and creates a good effect. If you use latex, there's every possibility that your brows will come off with the latex at the end of the night; so steer clear!
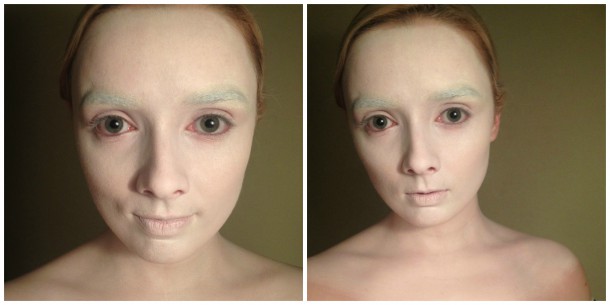
- When your brows have dried and feel smooth, apply a white foundation or face paint. I'm using Mac's full coverage foundation in white. It is very emollient and easy to use. If you're using a face paint (Snazaroo is a good and affordable brand, available from the Art and Hobby Shop) then take care to get the ratio of water to paint right, otherwise the effect will be streaky.
- Be prepared for how weird you'll look, and also keep in mind that white on the face tends to yellow the teeth, just in case that bothers you!
- Regardless of which white product you are using, it's best to apply it with a sponge for a smooth, opaque finish. Apply it all over the face (including eyes, brows eyelids and lips!), right up to the hairline.
- You may need a couple of layers across the brows to disguise them.
- Take the white down the neck and over any exposed skin across the collar bones and on the chest area. There's no need to paint your arms - just blend the line where the white ends so it recedes gradually.
- Set everything with a white or translucent powder. Use lots - we want an ultra-matte finish to the skin. This will also help to prevent your foundation from moving or creasing too much. If you're using face paint, you can probably skip this step as it will dry to a matte finish.
- Accentuate the collar bones by blending some matte grey eyeshadow along the natural line of the bone.
Step Two
- Take two matte brown eyeshadows - one medium, one dark, and draw in a new brow. With the medium shade, use the starting point of your natural brow as a guide and carefully extend your new brow in an exaggerated arch. This should be higher than your natural brow, as in the picture. An angled brush is best for this.
- Next, take the darker shade and the same angled brush. Draw some dark lines through the brow you've created, mimicking the direction of natural hairs. Don't try to make the hairs look natural though - we want a weird, stylised eyebrow that's well and truly over-the-top.
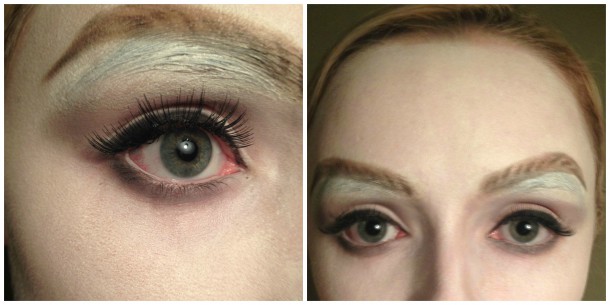
- Take another deep brown matte shadow and, using a fluffy brush, blend it along the eye socket - this is the area above the crease. You're literally creating the illusion of more lid, which we need since the eyebrows are suddenly so much higher. The lid should still be white.
- Bring this shadow under the eye and wing out slightly. We want a slightly bizarre, mildly spooky look, so blend everything out until it looks like a shadow around the eye.
Step Three
- Apply a set of strip lashes - something full but not overly dramatic. We're looking for a great natural lash effect - the lashes aren't the emphasis here.
- Apply a thickish line of black gel liner across the eye to hide the lash band. Don't wing out the line - stop it at the natural stopping point of your eye. The effect should be rounded (it just looks that bit weirder that way, which is desirable!).
- Don't worry if your line is messy; smudge it with a pencil brush to take away any harshness.
- Take the pencil brush and using only what is left on the brush, apply a light wash of liner under the eye. This should look shadowy and contrast nicely with the white skin.
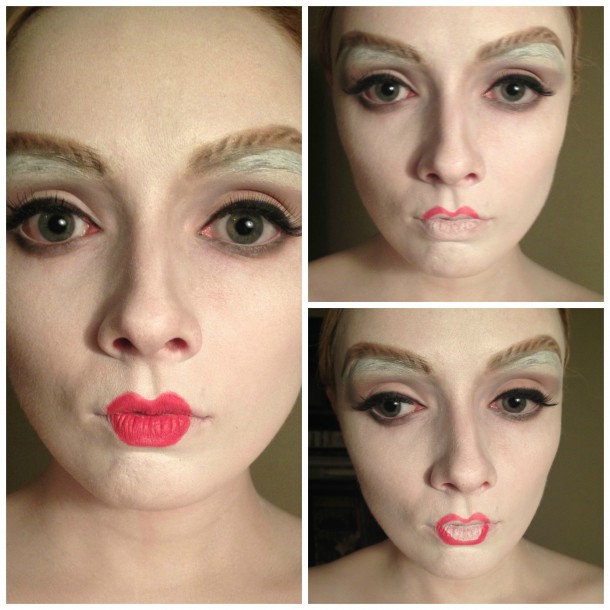
Step Four
Advertised
- If your lips are not completely obscured by the white foundation, apply some more and set it with powder.
- Then, taking a red lip liner, draw a little 'u' along your natural cupid's bow - this will be your guide.
- Now extend the line up in an exaggerated curve and bring it back down about half-way across the lip, as in the picture. We don't want to line the whole lip, but draw in a weird, pouty doll-like lip.
- When you're happy with your top lip, draw in the bottom one; overdrawing a little - there's no need to stay within the natural lip line!
- Fill in your freakish new lips with liner.
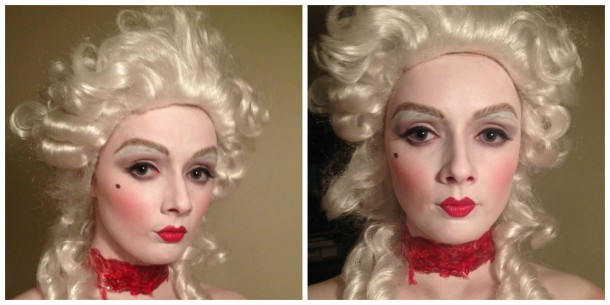
- Then, using a bright red lipstick and a flat lip brush, go over your lips and tidy them up.
- To add depth and make your lips look more realistic, take a deeper red and apply it along the outer line of your upper and lower lips. Don't make a harsh line; blend the colours together so that no lines are obvious.
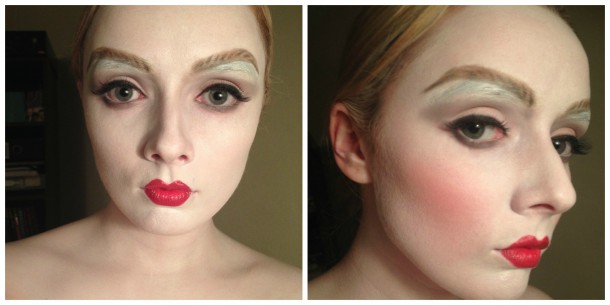
Step Five
- Grab a blush brush and the most aggressively pigmented pink colour you own and apply the blush to the apple of your cheek - bring it lower than you usually would and don't bring it back to the hairline.
- It's important that the blush be a powder formulation - the skin has been heavily powdered, so if you try to apply a cream over the powder it will get claggy and ruin the effect.
- I've layered a pink blush on top of a coral one here for added toomuchness (it's not a word, but it's what we want!)
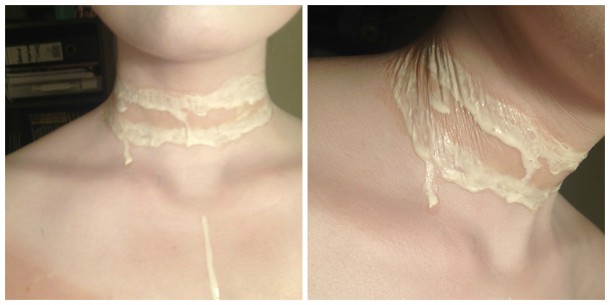
Step Six
- Dip a cotton bud in some liquid latex (available from the Art and Hobby Shop) and trace the outline of a nasty wound across your neck.
- This will take a little patience as you need to wait for each layer to dry before adding more.
- Apply more in some areas than others for uneven texture. Drips and chunky bits are fine.
- You'll feel the latex tighten on your skin as it dries- this will create a disgusting crinkly effect when you move your neck. Again, this is desirable.
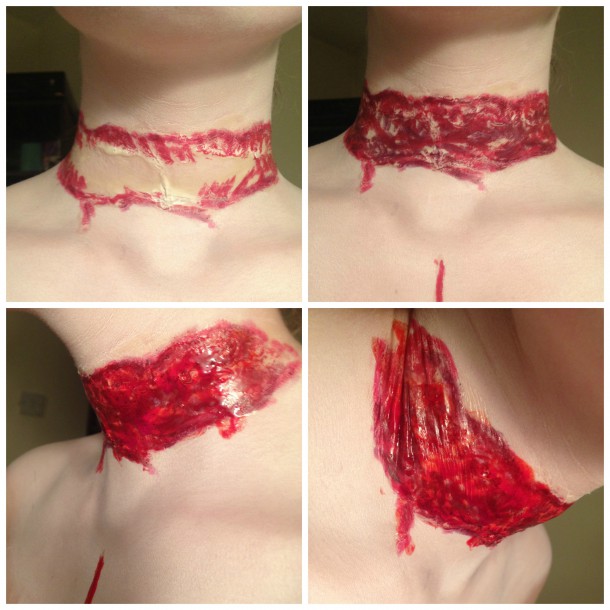
Step Seven
- Take a mid-red lipstick and messily trace along the edges of your wound.
- Grab a purple or plum lipstick and add some texture by applying the lipstick patchily, using pressing and short dragging movements.
- Use anything up to four shades of red lipstick here (if you have them) to give the illusion of depth and texture.
- Next, take some false blood (if you're using the standard electric red stuff mix it with some of your purple lipstick to darken it) on a cotton bud and splodge it along the wound so that it looks shiny and, well...bloody!
- You should now have yourself an utterly rank neck-wound. If you want to be extra-disgusting, grab the edges of the dried latex here and there and pull them away from your neck. It will look like lovely dangling flaps of bloodied skin.

Step Eight
- Don your Marie Antoinette Wig and a disdainful facial expression, and go have fun! But don't forget your beauty spot!

Products Used
- Pritt Stick
- Mac Full Coverage Foundation in White (Available from Brown Thomas)
- Mac translucent setting powder
- Mac eyeshadows in Scene, Charcoal Brown, Brun and Shadowy Lady
- No.7 False Eyelashes 10 Natural Volume
- Maybelline gel liner in Black
- Mac Lip liner in Redd
- Rimmel Moisture Renew Lipstick in Mayfair Red Lady
- NARS Velvet Matte Lip pencil in Mysterious Red
- Mac lipsticks in Cyber and Dubonnet
- Armani Blush pallete in Eccentrico
- Mac Blush in Well Dressed
- Kryolan Special Effects Latex Liquid (Available from Make Up For Ever stores, but a more affordable version can be found at the Art and Hobby Shop)
- Fake Blood (Available from Claire's Accessories)
- Baroque Wig (Available from Fun Palace in St. Stephen's Green)
- Mac pencil in Coffee
Advertised
What do you think? Have you found any useful tips here? And Happy Halloween!

